
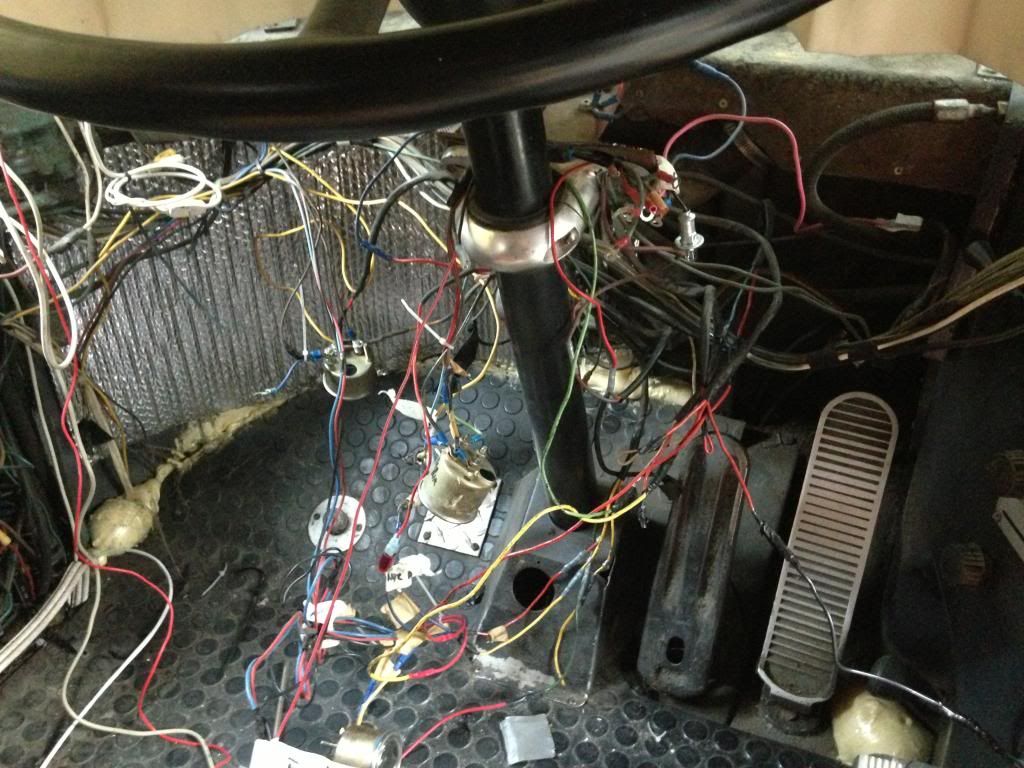
Well it began as an idea and then it escalated to a major re-wire and even bigger price tag when i was done, but it is finally done and all works like new again. Here is a few pics
[img]http://i1207.photobucket.com/albums/bb4 ... G_0060.jpg[/img]
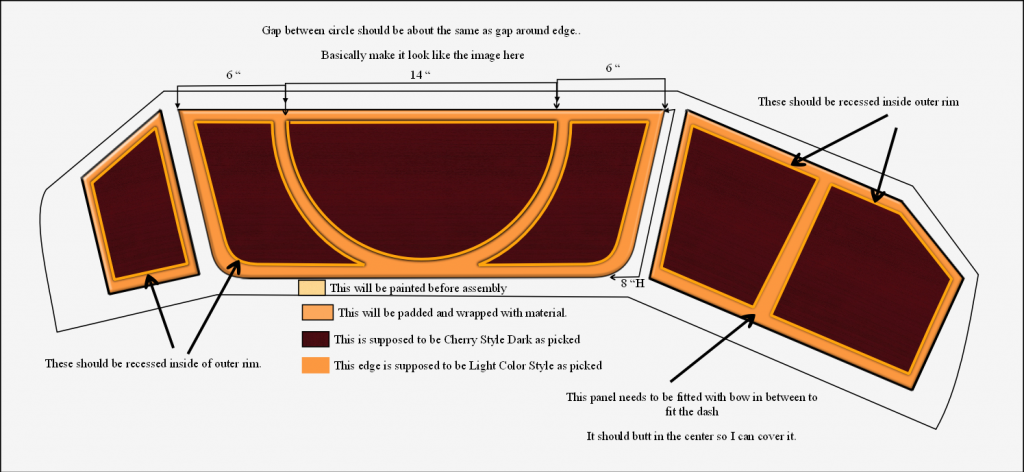
This is the Original Design I Drew on the Computer. Don't use the measurements, I changed them before cnc cut it all out.
[img]http://i1207.photobucket.com/albums/bb4 ... Dashv2.png[/img]
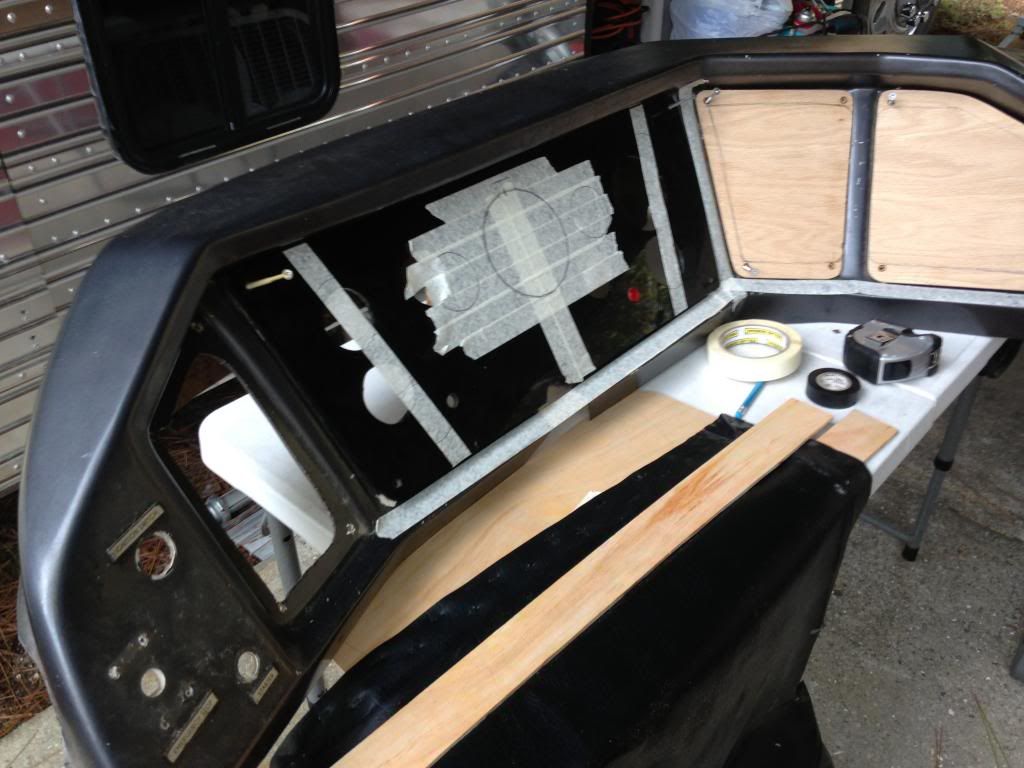
Here I was playing with more ideas
[img]http://i1207.photobucket.com/albums/bb4 ... G_0073.jpg[/img]
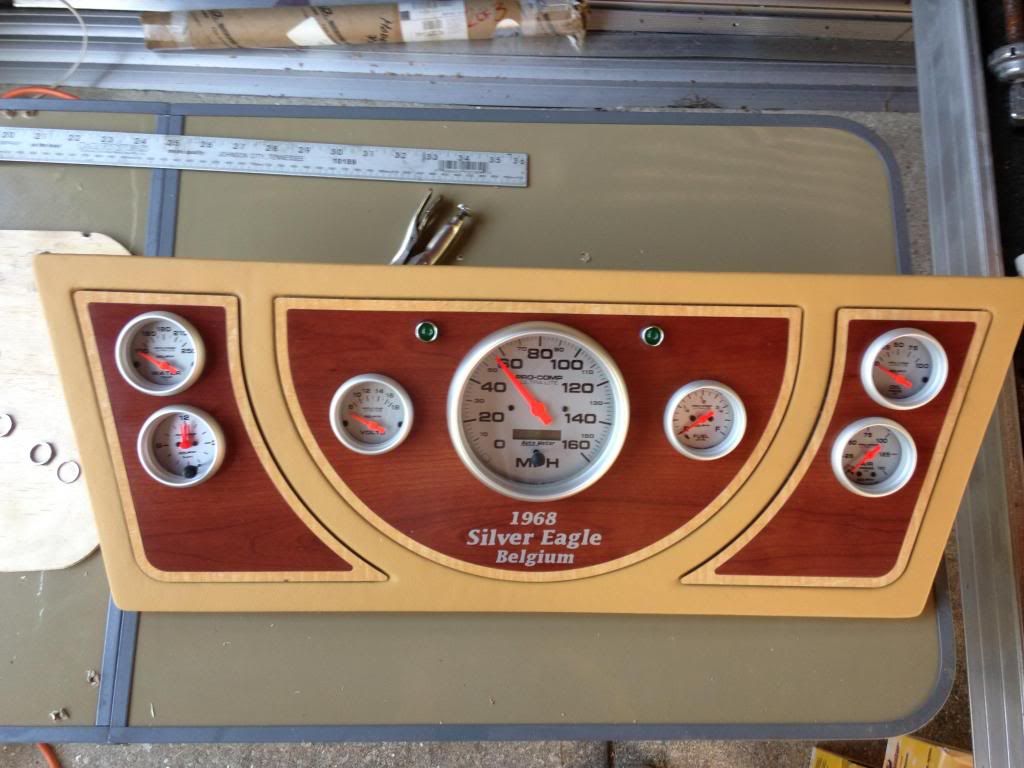
This is the center panel after it was made on a cnc machine and before it was wrapped in Leather.
[img]http://i1207.photobucket.com/albums/bb4 ... G_0076.jpg[/img]
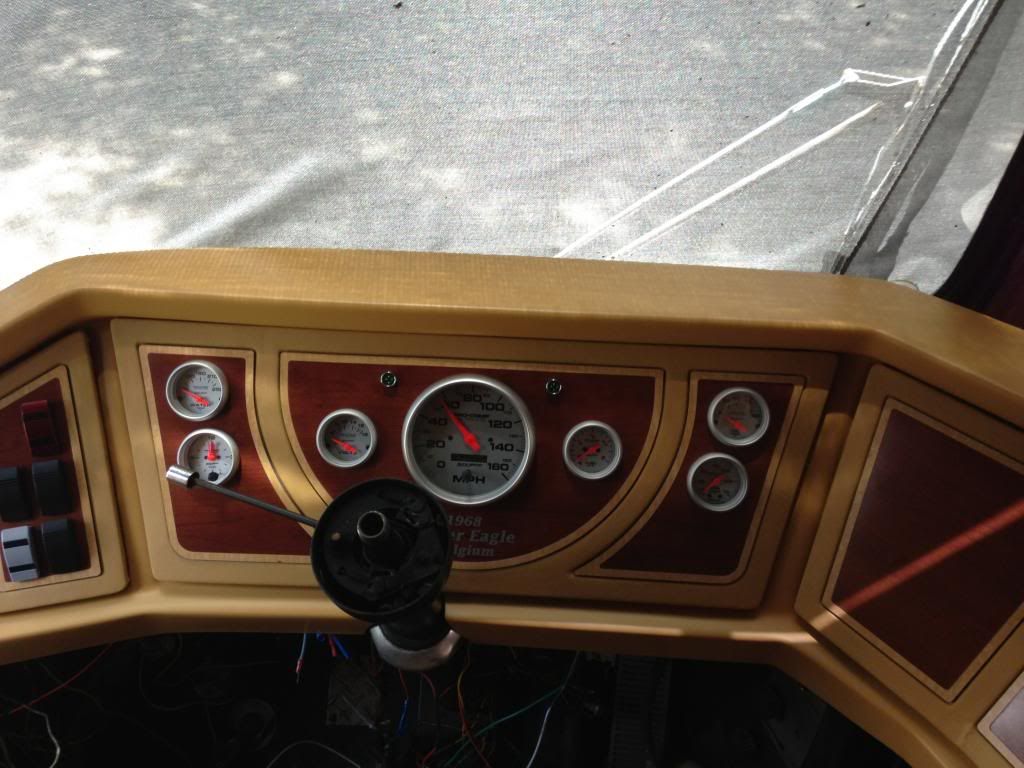
Here, the new Autometer Gauges are in position and the leather is wrapped around the edges. The Turn Signals were bought at Radio Shack. Who would have guessed?
The Center Speedometer is programable and is claimed to work on the eagle.
[img]http://i1207.photobucket.com/albums/bb4 ... G_0100.jpg[/img]
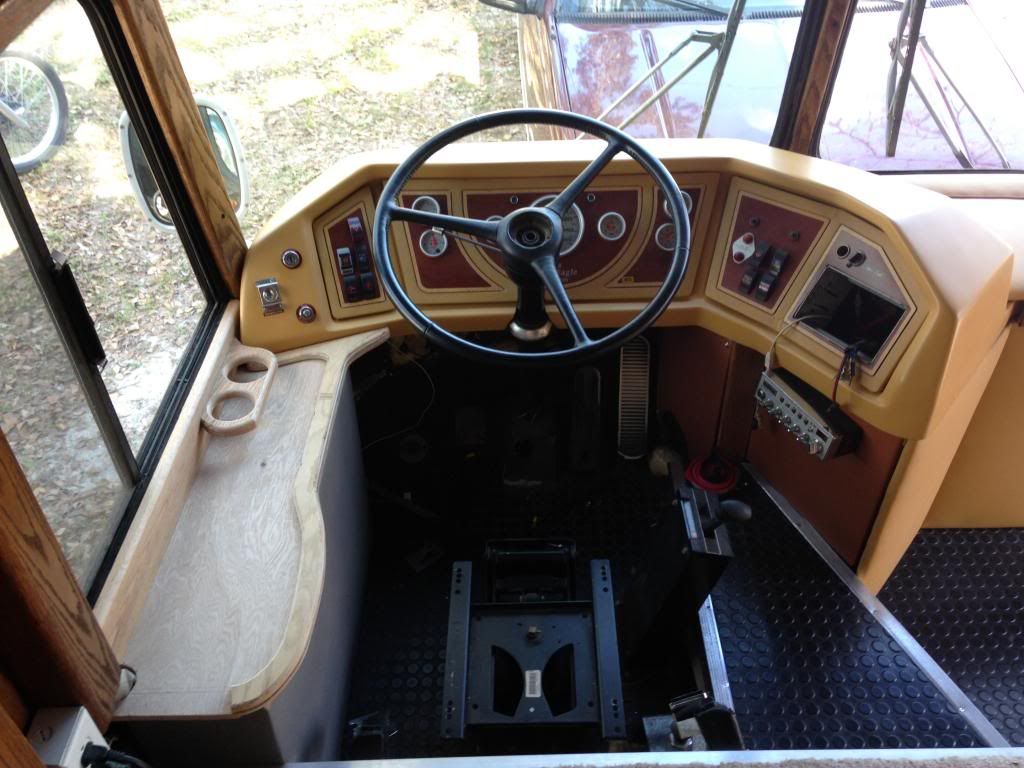
The dash is back in the bus for fitting. I Sprayed R&M Dash with a Matched Automotive paint designed for Vinyl and Leather. The CNC work really changes the look.[img]http://i1207.photobucket.com/albums/bb4 ... G_0106.jpg[/img]
This is the Circuit Breaker Box I made.
[img]http://i1207.photobucket.com/albums/bb4 ... G_0854.jpg[/img]
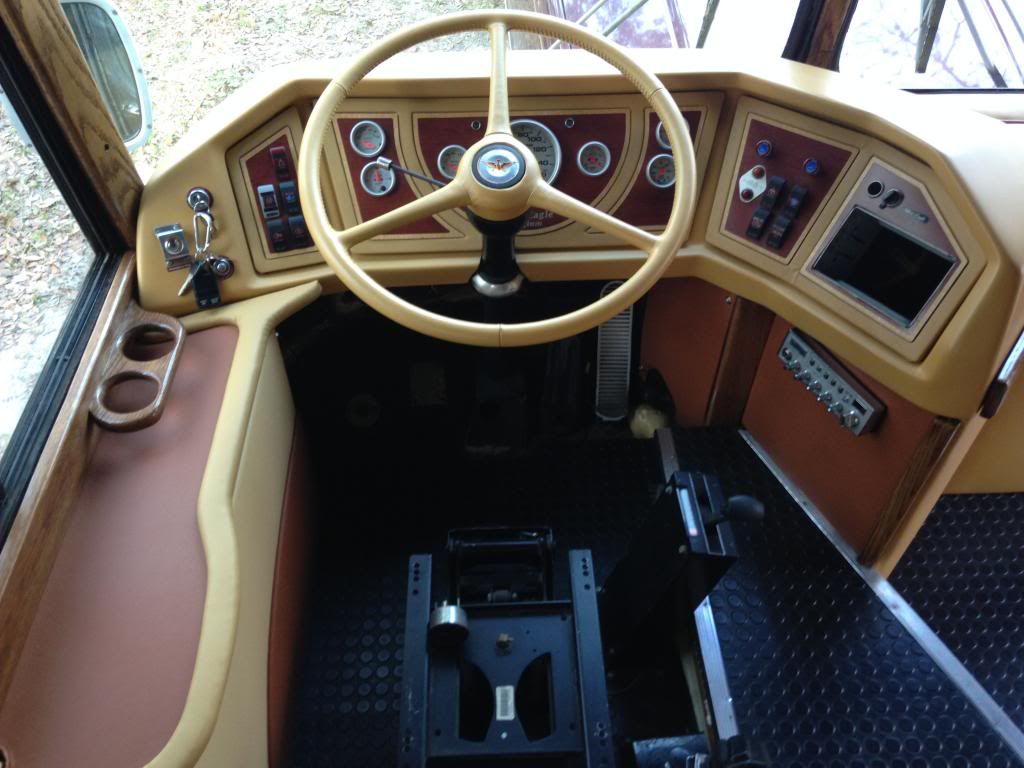
Here is the whole dash with the gauges and new rocker switches in place. The circuit breaker box fit nice and I designed it that way to give compliment to the left side of the dash. [img]http://i1207.photobucket.com/albums/bb4 ... G_0862.jpg[/img]
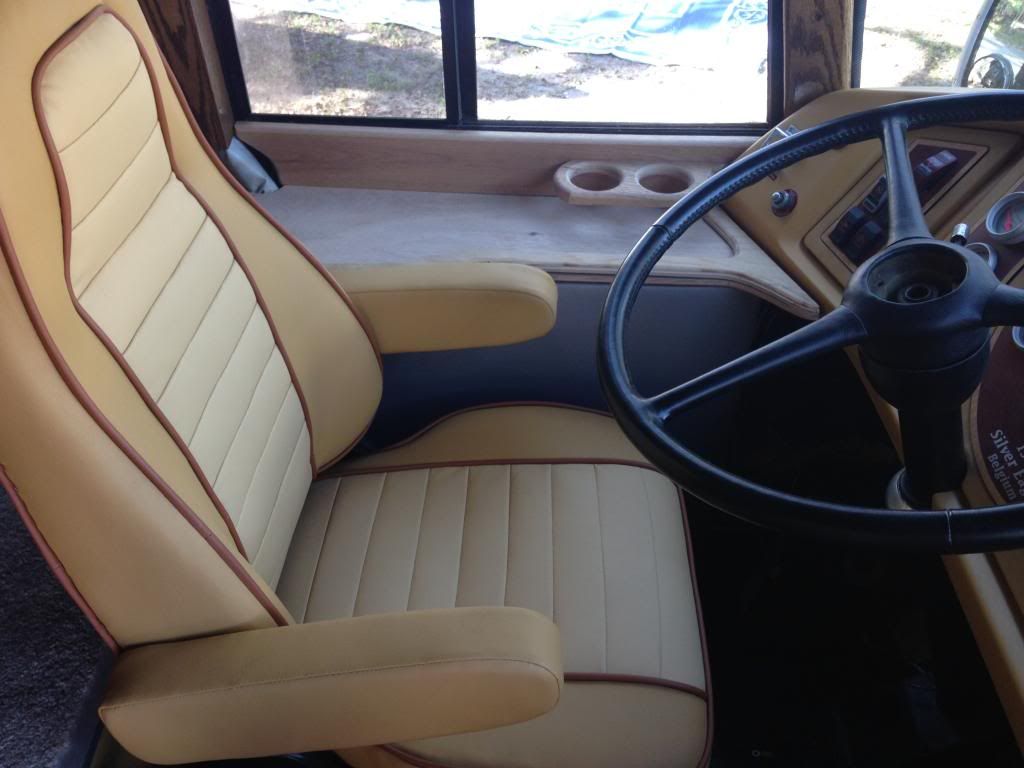
Now I added the Oak Cup Holders on side rest pamel and checking to make sure seat doesn't rub circuit breaker box
[img]http://i1207.photobucket.com/albums/bb4 ... G_0866.jpg[/img]
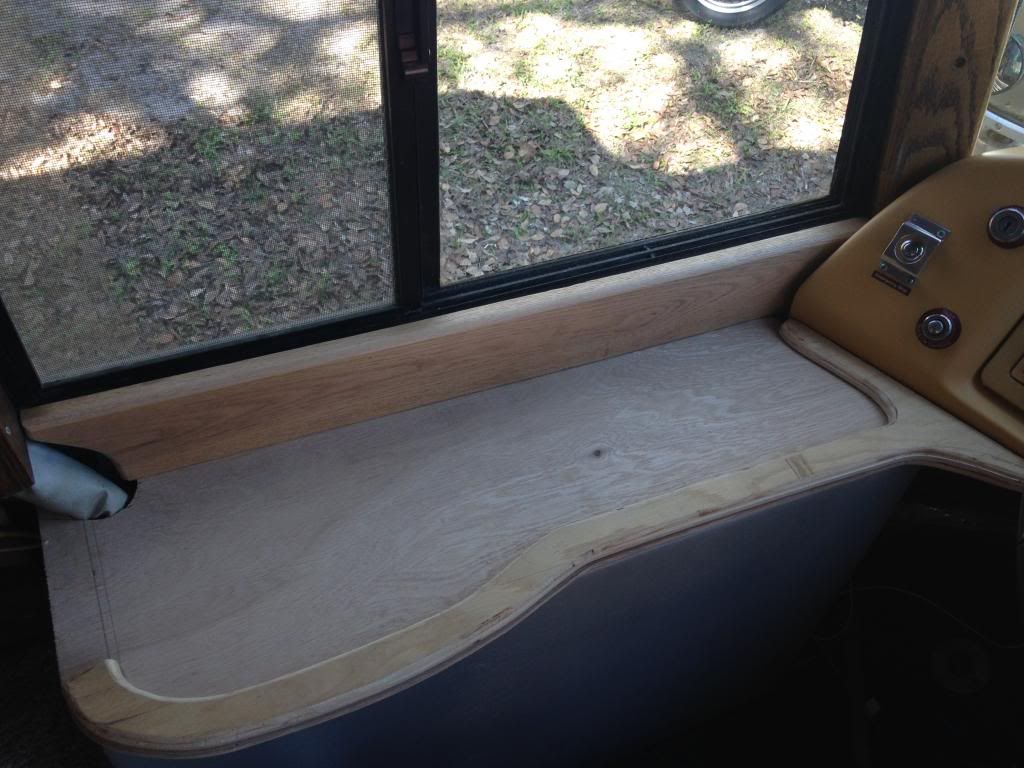
Here, the Side panel has been stained and cleared, flat upper surface wrapped with material and fitted.
[img]http://i1207.photobucket.com/albums/bb4 ... G_0923.jpg[/img]
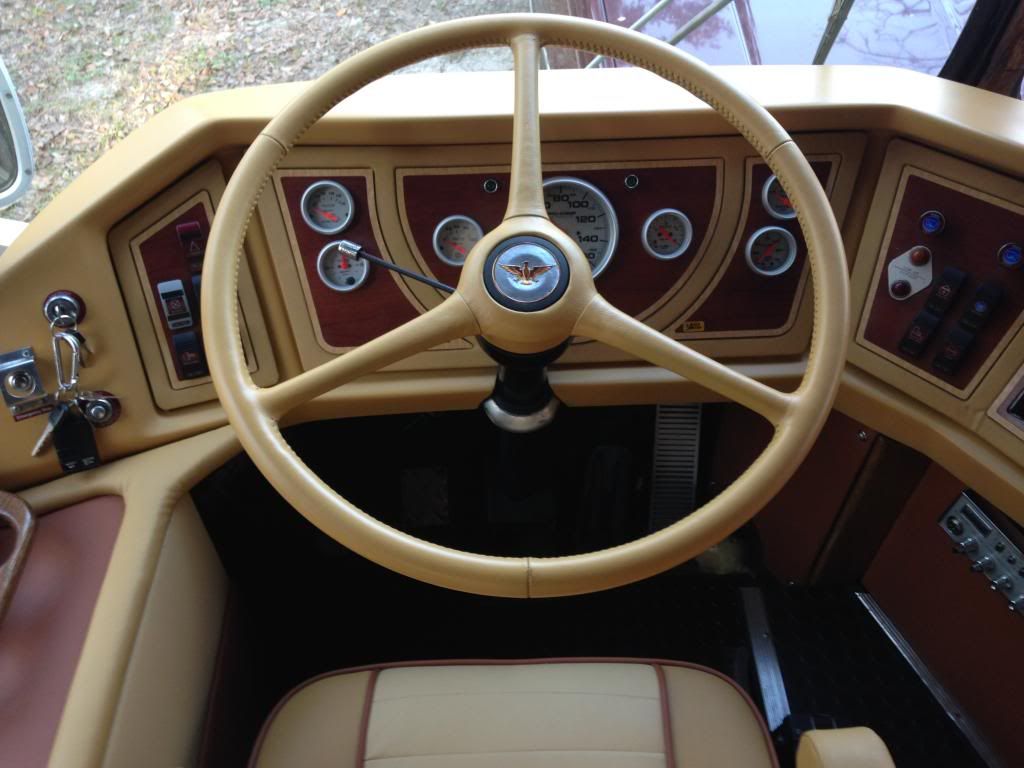
I dyed the steering wheel leather with an automotive spray designed for leather and vinyl. I restored the horn button although this probably is not correct as far as colors but I thought it looked good.[img]http://i1207.photobucket.com/albums/bb4 ... G_0937.jpg[/img]
[img]http://i1207.photobucket.com/albums/bb4 ... G_0945.jpg[/img]
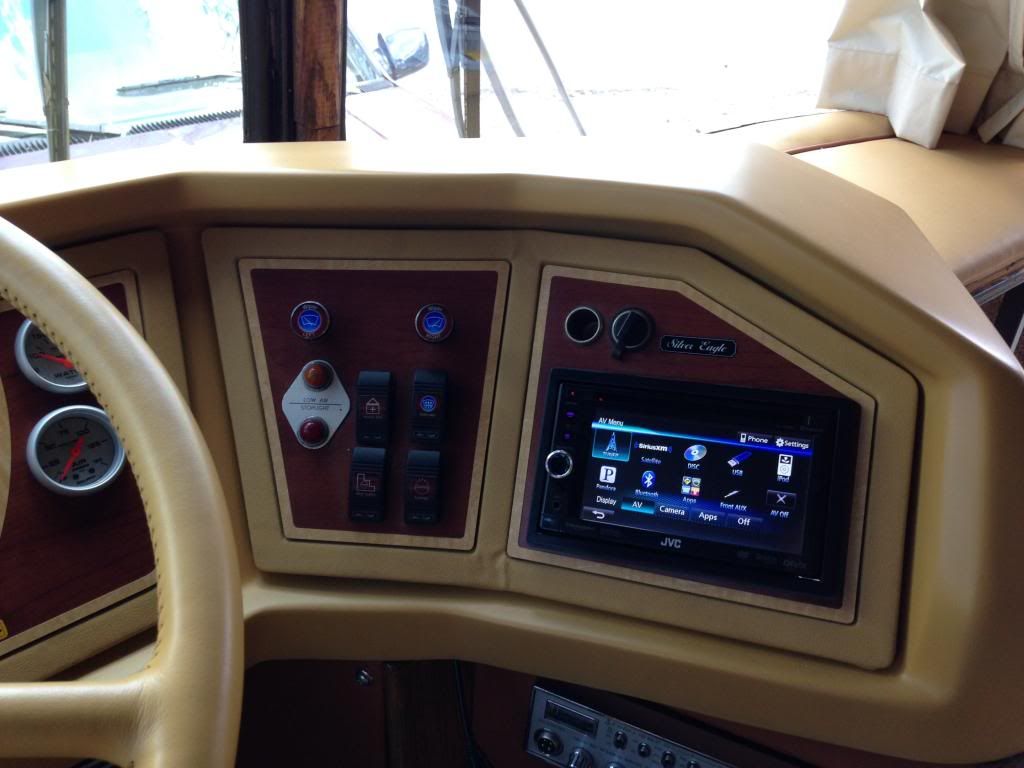
Here is the New Head Unit-Wow it makes this Eagle Dash Come to Life. I designed all of the Switch Labels individually for specific uses and had a Vinyl shop print them off including Wiper ID's
[img]http://i1207.photobucket.com/albums/bb4 ... G_0977.jpg[/img]
I will put a few more Final Pics later this week after I have it all detailed out from the remodel.
Announcement Block
As of 12/1/2021, a major update of the forum software was accomplished
Update: 4/20/2024: The Eagles email account at GoDaddy no longer works. I have set up a gmail account as a workaround: eaglesinternational.email@gmail.com (This link seems to work for my outlook email, but may not work for other email platforms. If it does not load, copy and paste the link in your platform). Any mail concerning the forum should be sent to the gmail address.
Update 4/30/2024 We have had several problems the past few days. I think they are resolved for now. For more information click here: viewtopic.php?p=33804&sid=91e6bc9a093a1 ... 303#p33804
Registration is open to the public (*) and free from any cost or obligation. Please allow up to 36 hours for your application to be processed. If you have problems registering, please email me at: eaglesinternational.email@gmail.com
(*) spambots will be deleted -- only legitimate public applications will be processed.
Reminder: the "quick links" menu offers you the best navigation of this forum -- you need to be registered and logged in to see that menu.
MoonrakerBus 1968 05 ProtoType /
-
moonrakerbus

- Posts: 30
- Joined: Mon Dec 06, 2010 11:19 am
- Bus Model: 1968/67 Bus & Car Co. SE 05
With Slide Out and 8V71
Vin#8005.
Where is vin#8006 anyone? - Location: Florida for Now
- Contact:
Custom Dash Is Done
1968/67 Bus & Car Co. SE 05
With Slide Out and 8V71
Vin#8005.
Nick & Tonyia Cartos
Where is vin#8006 anyone?
In Florida For Now
With Slide Out and 8V71
Vin#8005.
Nick & Tonyia Cartos
Where is vin#8006 anyone?
In Florida For Now
-
moonrakerbus
- Posts: 30
- Joined: Mon Dec 06, 2010 11:19 am
- Bus Model: 1968/67 Bus & Car Co. SE 05
With Slide Out and 8V71
Vin#8005.
Where is vin#8006 anyone? - Location: Florida for Now
- Contact:
No Ordinary Storage Bay
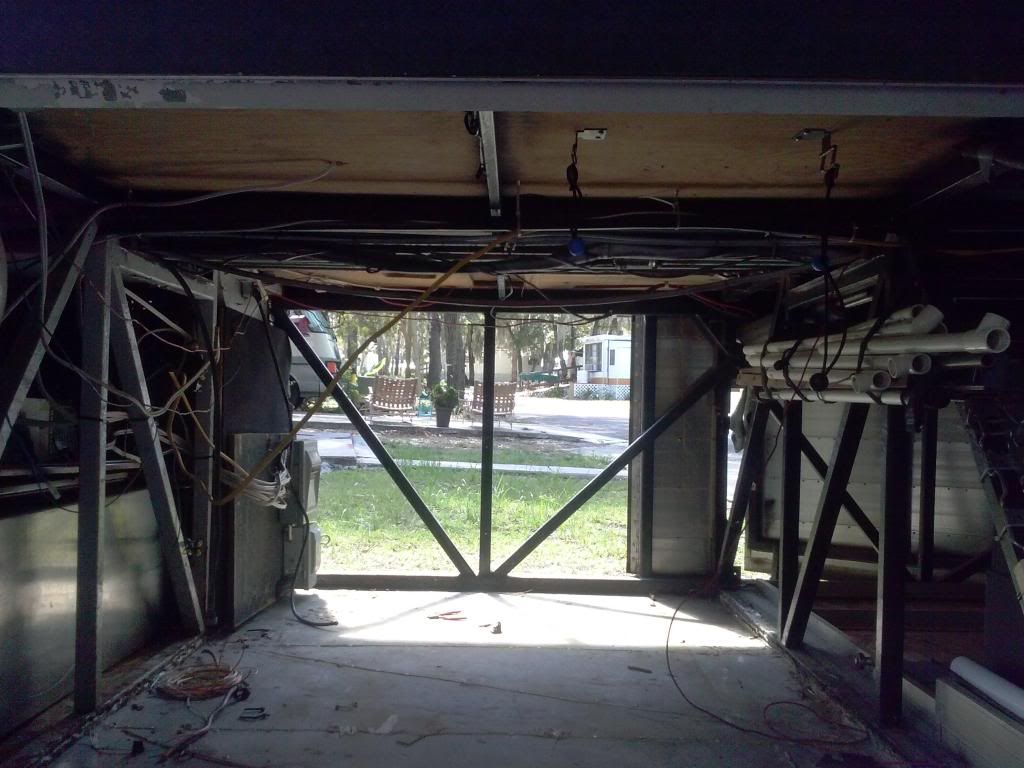
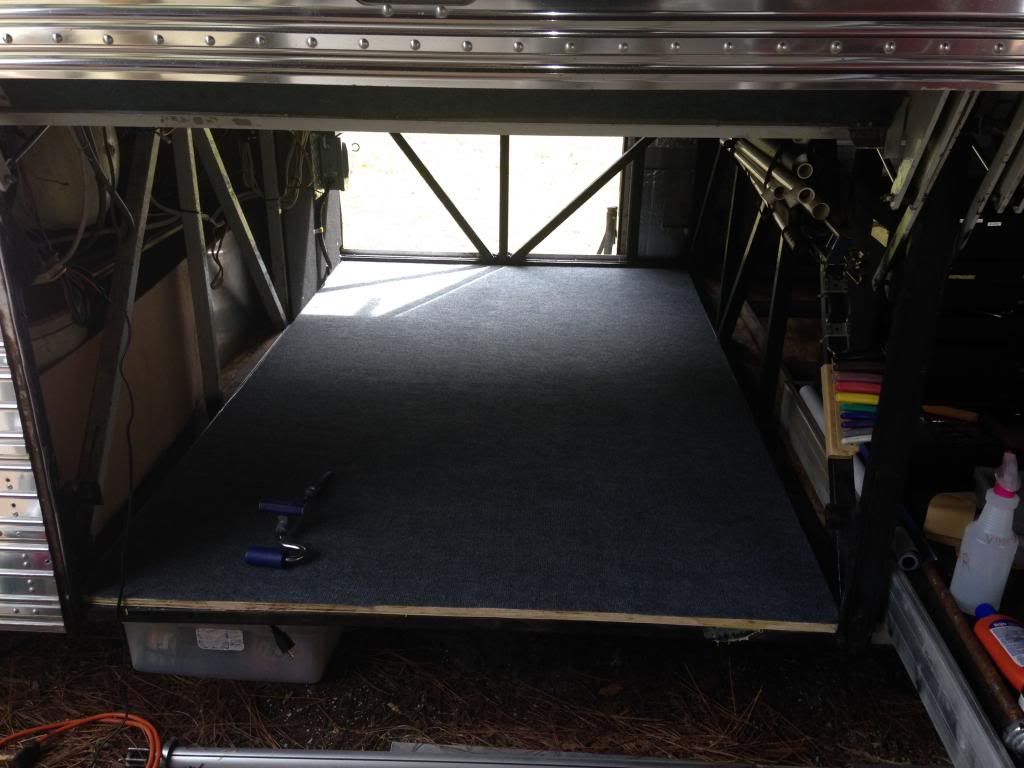
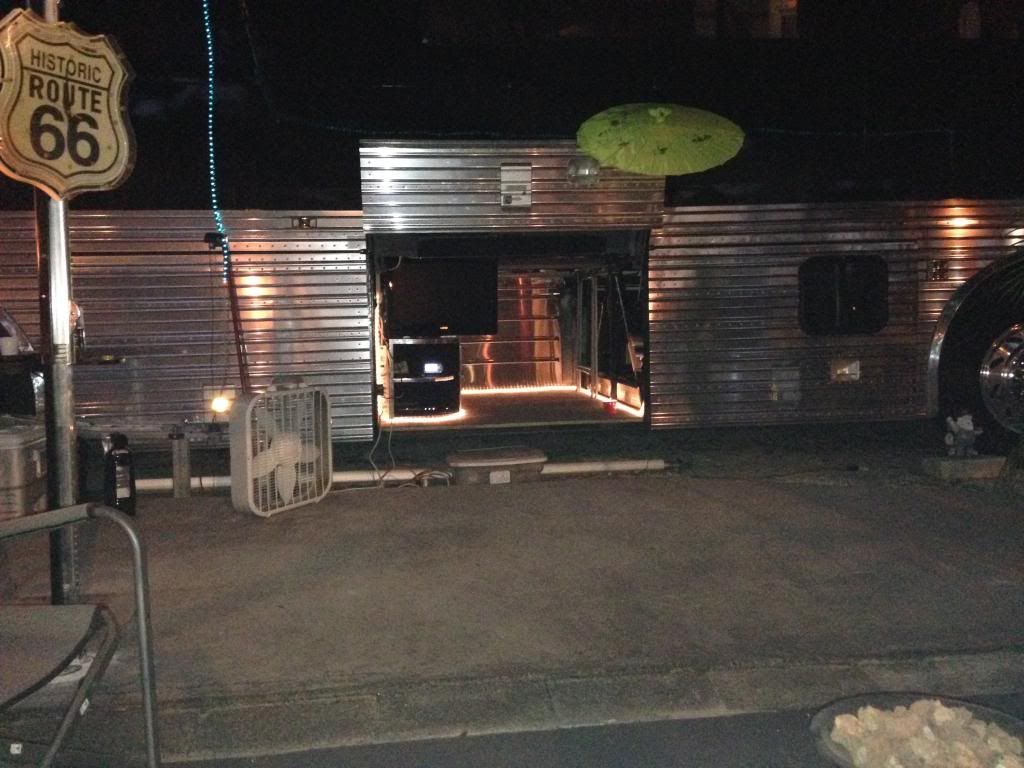
I originally added a TV in the 2nd storage bay right after we bought this almost 4 years ago and last summer I found we had gotten a leak from the vent in the left bay door that was installed for a Basement A/C that was impractical and ducted wrong. I studied the situation and decided to remove the A/C completely and seal off the exhaust vent in the left bay door completely. I ripped up all of the partical board down to the floor skin. I torn out the side panels and broke open more cans of worms...Anyway, I replaced floor with Marine 3/4 in plywood and cleaned up the wiring that was left to hang forever.
[img]http://i1207.photobucket.com/albums/bb4 ... M00329.jpg[/img]
[img]http://i1207.photobucket.com/albums/bb4 ... G_0339.jpg[/img]
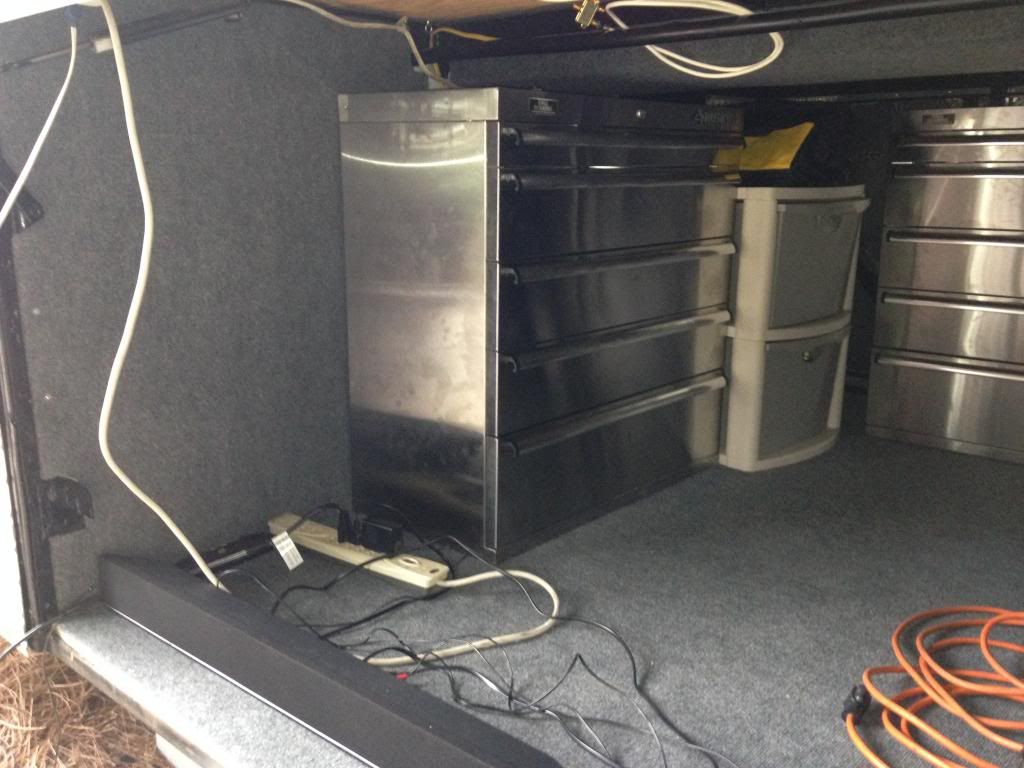
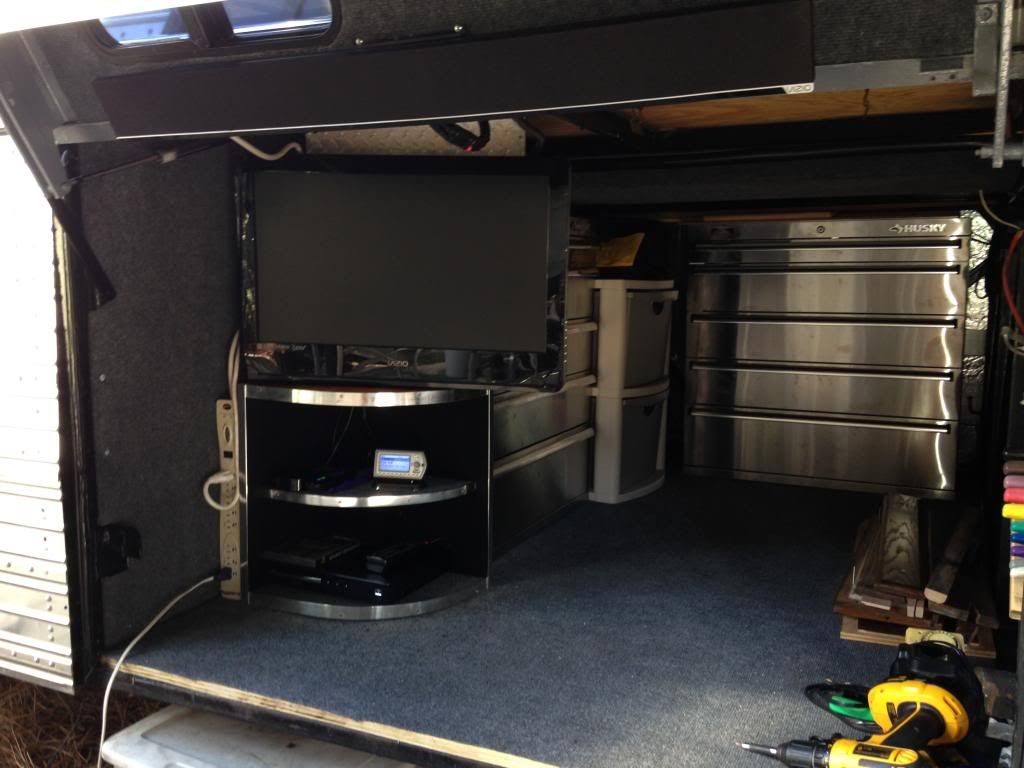
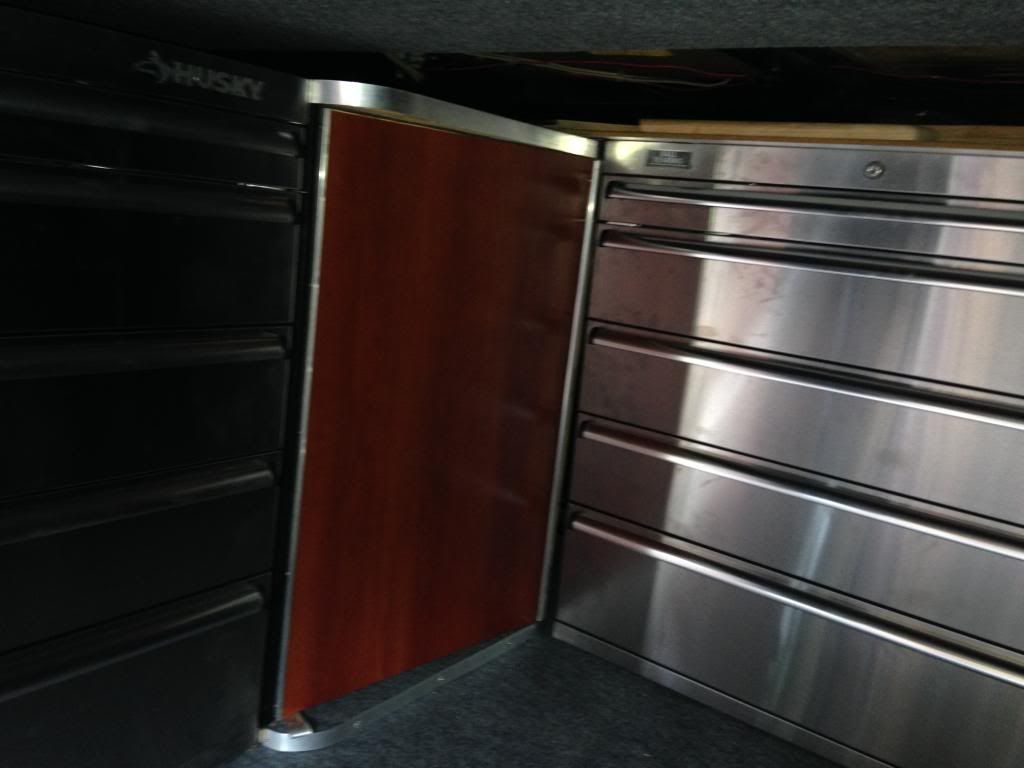
Here I was sizing up new Stainless Steel Tool Boxes and space for new Entertainment center. I built new side walls and carpeted them
[img]http://i1207.photobucket.com/albums/bb4 ... G_0349.jpg[/img]
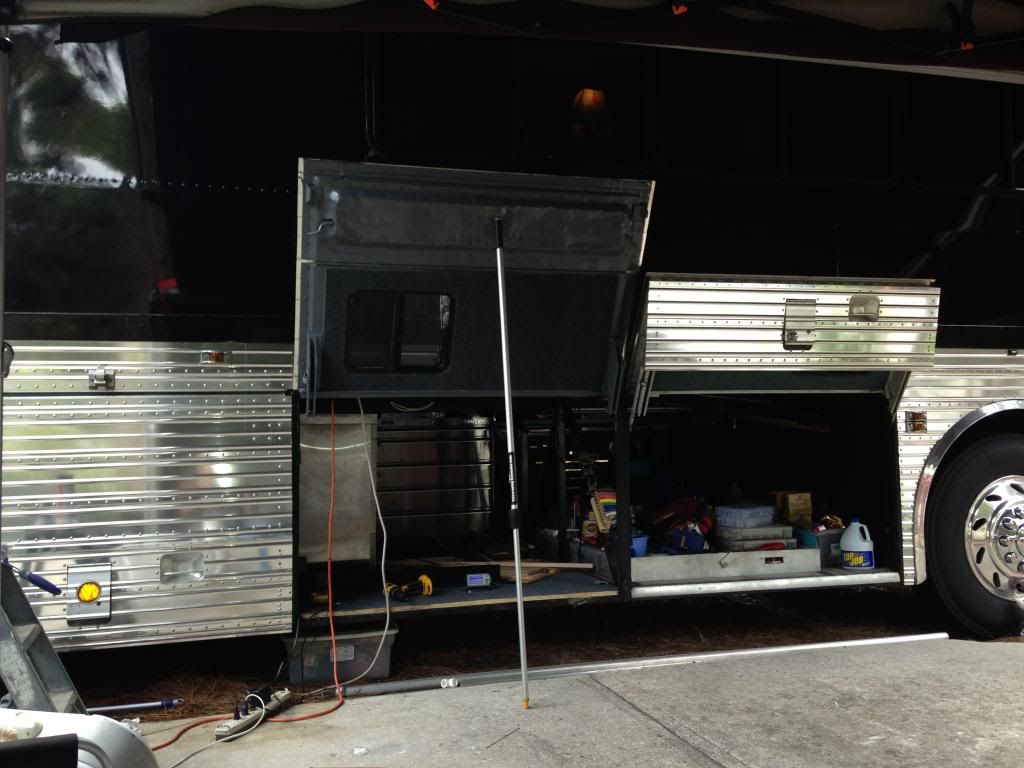
I sanded and repainted inside of bay door, added new carpet and new weather stripping on the edges. If any of you does this, be careful, that door is HEAVY when unhooked from the prop rod.
[img]http://i1207.photobucket.com/albums/bb4 ... G_0354.jpg[/img]
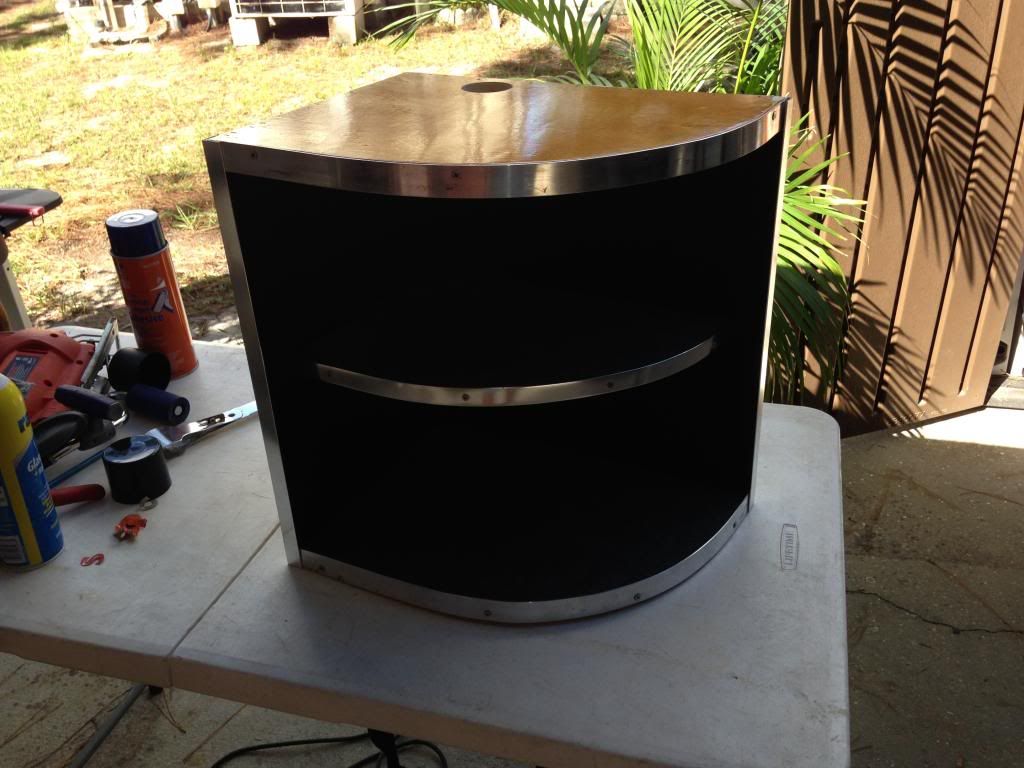
I had an old desk I cut up to make this shelved entertainment center. I used Alluminum flat stock and polished it to blend with all of the other panels and to accent the tool boxes.[img]http://i1207.photobucket.com/albums/bb4 ... G_0359.jpg[/img]
[img]http://i1207.photobucket.com/albums/bb4 ... G_0362.jpg[/img]
I wanted a place to put Spray Paints, Lubricants, Oil etc in so i that this worked out good. The panel is a left over from the dash project.
[img]http://i1207.photobucket.com/albums/bb4 ... G_0367.jpg[/img]
[img]http://i1207.photobucket.com/albums/bb4 ... G_0373.jpg[/img]
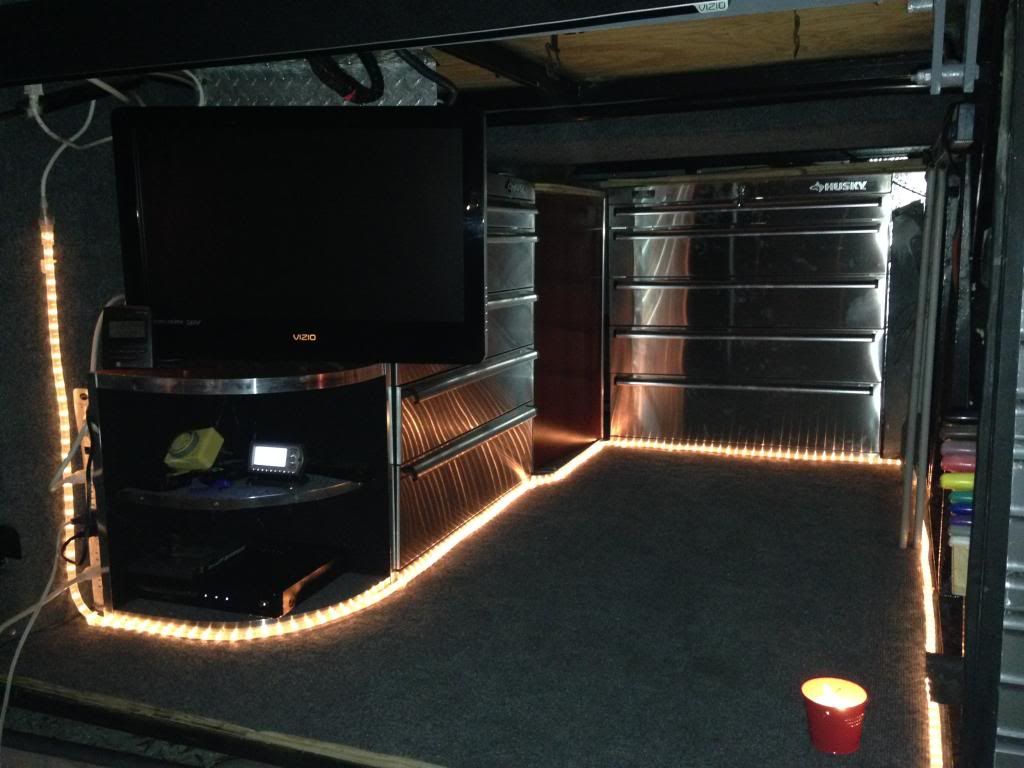
I added Rope Lights to add some flair to it.
[img]http://i1207.photobucket.com/albums/bb4 ... G_0383.jpg[/img]
[img]http://i1207.photobucket.com/albums/bb4 ... G_0384.jpg[/img]
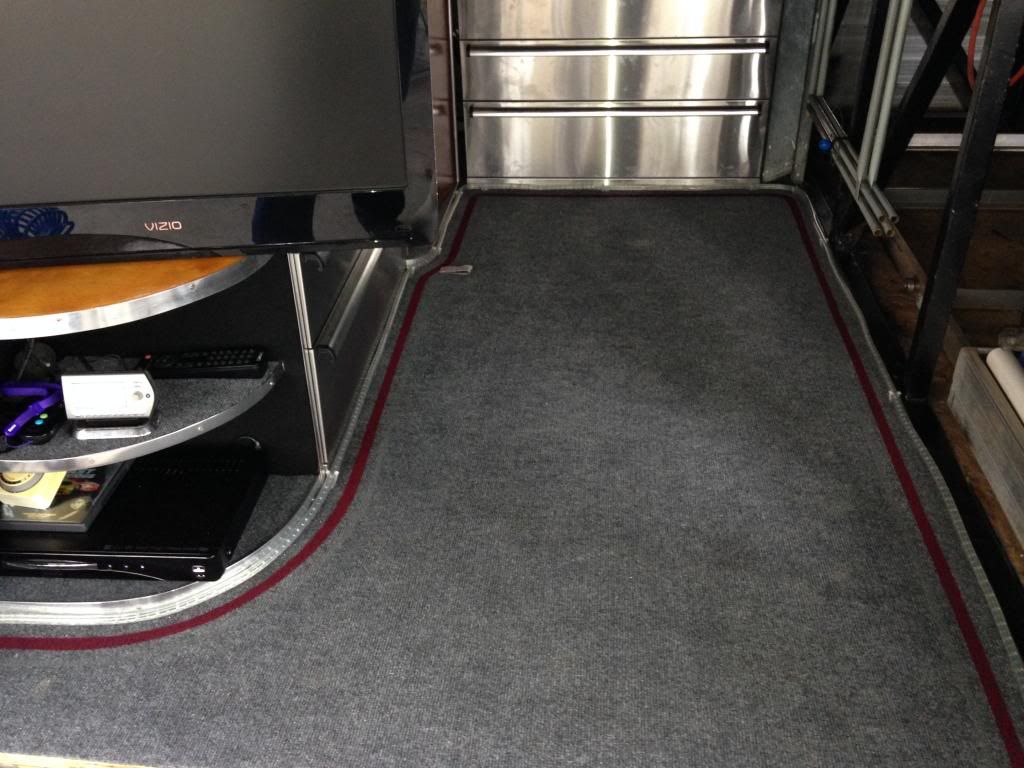
This is a neat trick for some of you wanting to add a little more to your carpet. I took 3/4 inch masking tape and taped off the stripes, added masking paper around the edges and made sure my edges were pressed down tight so the paint wouldn't bleed. I used a Vinyl Dye designed for Carpet and Vinyl. Holds up real well..(FYI, If used on older carpet, make sure you clean it very well with a perp-solvent or hard wax and grease remover for it to adheare)[img]http://i1207.photobucket.com/albums/bb4 ... G_0413.jpg[/img]
I added a Visio 42ich sound bar on the upper part of the bay door so when opened the sound was directed outward and when closed, it was hidden and out of the way. It gives out great powerful sound..Ask our RV neighbors..lol
[img]http://i1207.photobucket.com/albums/bb4 ... M00329.jpg[/img]
[img]http://i1207.photobucket.com/albums/bb4 ... G_0339.jpg[/img]
Here I was sizing up new Stainless Steel Tool Boxes and space for new Entertainment center. I built new side walls and carpeted them
[img]http://i1207.photobucket.com/albums/bb4 ... G_0349.jpg[/img]
I sanded and repainted inside of bay door, added new carpet and new weather stripping on the edges. If any of you does this, be careful, that door is HEAVY when unhooked from the prop rod.
[img]http://i1207.photobucket.com/albums/bb4 ... G_0354.jpg[/img]
I had an old desk I cut up to make this shelved entertainment center. I used Alluminum flat stock and polished it to blend with all of the other panels and to accent the tool boxes.[img]http://i1207.photobucket.com/albums/bb4 ... G_0359.jpg[/img]
[img]http://i1207.photobucket.com/albums/bb4 ... G_0362.jpg[/img]
I wanted a place to put Spray Paints, Lubricants, Oil etc in so i that this worked out good. The panel is a left over from the dash project.
[img]http://i1207.photobucket.com/albums/bb4 ... G_0367.jpg[/img]
[img]http://i1207.photobucket.com/albums/bb4 ... G_0373.jpg[/img]
I added Rope Lights to add some flair to it.
[img]http://i1207.photobucket.com/albums/bb4 ... G_0383.jpg[/img]
[img]http://i1207.photobucket.com/albums/bb4 ... G_0384.jpg[/img]
This is a neat trick for some of you wanting to add a little more to your carpet. I took 3/4 inch masking tape and taped off the stripes, added masking paper around the edges and made sure my edges were pressed down tight so the paint wouldn't bleed. I used a Vinyl Dye designed for Carpet and Vinyl. Holds up real well..(FYI, If used on older carpet, make sure you clean it very well with a perp-solvent or hard wax and grease remover for it to adheare)[img]http://i1207.photobucket.com/albums/bb4 ... G_0413.jpg[/img]
I added a Visio 42ich sound bar on the upper part of the bay door so when opened the sound was directed outward and when closed, it was hidden and out of the way. It gives out great powerful sound..Ask our RV neighbors..lol
1968/67 Bus & Car Co. SE 05
With Slide Out and 8V71
Vin#8005.
Nick & Tonyia Cartos
Where is vin#8006 anyone?
In Florida For Now
With Slide Out and 8V71
Vin#8005.
Nick & Tonyia Cartos
Where is vin#8006 anyone?
In Florida For Now
-
rusty

- Moderator

- Posts: 1547
- Joined: Thu Oct 09, 2008 3:22 pm
- FMCA #: F341087
- Bus Model: 1972 05 completed 2003
1994 15/45 in progress - Location: Johnstown Co.
Re: Custom Dash Is Done
Now thats a dash. Nice work.
Wayne
Wayne
-
rusty
- Moderator
- Posts: 1547
- Joined: Thu Oct 09, 2008 3:22 pm
- FMCA #: F341087
- Bus Model: 1972 05 completed 2003
1994 15/45 in progress - Location: Johnstown Co.
Re: No Ordinary Storage Bay
Nick you setting the bar to high.
Wayne
Wayne
-
akroyaleagle

- Club Member
- Posts: 486
- Joined: Tue Oct 14, 2008 12:11 pm
- FMCA #: F180747
- Bus Model: 1978 Model 05
- Location: Sioux Falls, SD
-
akroyaleagle
- Club Member
- Posts: 486
- Joined: Tue Oct 14, 2008 12:11 pm
- FMCA #: F180747
- Bus Model: 1978 Model 05
- Location: Sioux Falls, SD
-
buscrazyinFL

- Club Member
- Posts: 655
- Joined: Tue Nov 04, 2008 8:47 pm
- FMCA #: F385289
- Bus Model: 1972 Eagle 05
Vin # 8851 - Location: Winter Haven, FL
Re: Custom Dash Is Done
Nick, you did an awesome job. Are you sure you want to sell your Eagle?
Manny & Darlene's
1972 Silver Eagle 05
VIN # 8851
8V71 / HT740 4 Speed Automatic
1972 Silver Eagle 05
VIN # 8851
8V71 / HT740 4 Speed Automatic
-
Eagle Andy

- Club Member
- Posts: 1024
- Joined: Tue Oct 14, 2008 4:37 pm
- FMCA #: F299044
- Bus Model: 1968 SE Model 05
- Location: Miles city Mt
Re: Custom Dash Is Done
Wow that is very nice, Nice detail and very clean.
Andy Wright 68 Silver Eagle Model 5 8V92 #7481
-
moonrakerbus
- Posts: 30
- Joined: Mon Dec 06, 2010 11:19 am
- Bus Model: 1968/67 Bus & Car Co. SE 05
With Slide Out and 8V71
Vin#8005.
Where is vin#8006 anyone? - Location: Florida for Now
- Contact:
Re: Custom Dash Is Done
Well Manny, After all of this pain staking work, I have my doubts for sure. I always wanted this Eagle to come to life like this and after designing and building all of this with my own two hands, the wife and I sure like it more. If we get our price, I will let her ride but if not, I will keep making improvements as we go along..By the way, I did all of this in a campground..That made this job even more testing..
1968/67 Bus & Car Co. SE 05
With Slide Out and 8V71
Vin#8005.
Nick & Tonyia Cartos
Where is vin#8006 anyone?
In Florida For Now
With Slide Out and 8V71
Vin#8005.
Nick & Tonyia Cartos
Where is vin#8006 anyone?
In Florida For Now
-
moonrakerbus
- Posts: 30
- Joined: Mon Dec 06, 2010 11:19 am
- Bus Model: 1968/67 Bus & Car Co. SE 05
With Slide Out and 8V71
Vin#8005.
Where is vin#8006 anyone? - Location: Florida for Now
- Contact:
Re: No Ordinary Storage Bay
Thanks Joe and Wayne. Since I constantly make improvements on my Eagle, the tool boxes seem to be needed and Since we full time live in our Eagle the entertainment center makes it nice to be able to sit outside and enjoy music or TV. I thought about a built in grill but it took to much room. This way I still have practically two full empty bays to pack our crap in when we travel.
1968/67 Bus & Car Co. SE 05
With Slide Out and 8V71
Vin#8005.
Nick & Tonyia Cartos
Where is vin#8006 anyone?
In Florida For Now
With Slide Out and 8V71
Vin#8005.
Nick & Tonyia Cartos
Where is vin#8006 anyone?
In Florida For Now